ASTROFLOPPYIMAGE 7.1.2024
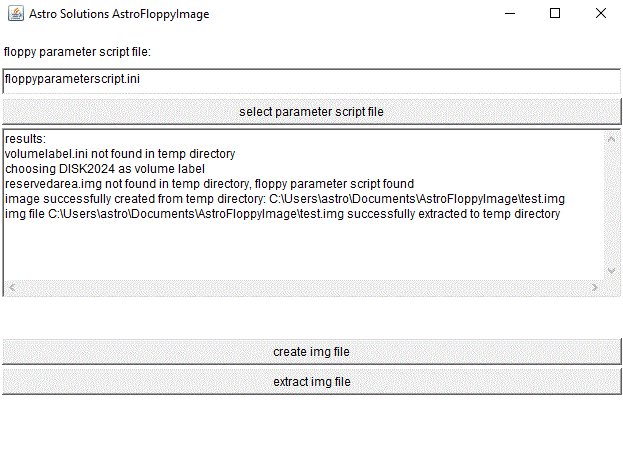
AstroFloppyImage is a free tool for extracting the content of
floppy images to the temp directory and creating new floppy
images from the content of the temp directory.
If you want to extract a floppy image, select "extract img file",
choose a file and check the folder temp/files for the files.
If you want to create a floppy image, delete the content of
temp/files and temp/reservedarea.img, put your files there and
select "create img file".
Floppy images can be used with emulators like
hatari 1.8.0 (https://hatari.tuxfamily.org/download.html),
VMWare Player (http://www.vmware.com)
and VirtualBox (http://www.virtualbox.org). hatari 1.8.0 needs images with the
extension .st. If the extension is different, the emulator crashes.
UltraISO (https://www.ultraiso.com)
needs extensions like .img, .ima and .flp. Otherwise
it also crashes. If you rename your AstroFloppyImage file, you
can use it with both programs.
If you extract a floppy image, the boot sector and the reserved
area following it are copied to temp/reservedarea.img. If you
don't delete it, its parameters are used for the next created
img file, also if you selected another parameter script file.
You can replace temp/reservedarea.img by your own image of the
reserved area. If you extract a floppy image and a volume label
is found, it is copied to temp/volumelabel.ini, where the volume
label string can be changed. If you create a new floppy image,
the file temp/volumelabel.ini is searched and its content used
as volume label, if it exists. The volume label is stored as a
directory entry and the boot sector volume label bytes are not
changed. This is slightly incompatible to the ATARI ST, where you
see a folder in the root directory named like the volume label and
no disk label.
If you want to create new 1.44 MB or 720 KB floppy images, you should
delete temp/reservedarea.img and the content of temp/files, edit
volumelabel.ini and place your files in temp/files. Click
"select parameter script file" and choose floppyparameterscript.ini
for a 1.44 MB disk and floppyparameterscript720.ini for a 720 KB disk.
You can choose a destination file after clicking "create img file".
The 720 KB files should be named .st and the others .img or .ima.
If you want to create a disk image with more special parameters, you
should copy floppyparameterscript.ini or floppyparameterscript720.ini
and edit its parameters.
If you create a disk image with files from the temp directory and the
size of the disk image is exceeded, a number of reserved sectors,
which was greater than the total number of sectors, is displayed
in the results text area. This number is not the number of sectors
needed for your disk image, but the first reservation of disk space,
which exceeded the disk image size. The next reservations are skipped,
because there could be very slow calculations, if there was a very
big file in the files folder.
AstroFloppyImage is written in JAVA. The program is compatible to the
filenames of Windows and Linux unlike many other Astro Solutions JAVA
applications (except of the games), which use Windows filenames.
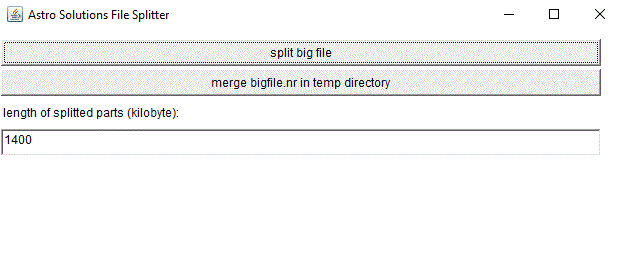
A free small tool for splitting files in smaller parts for multiple floppy
disks or CD-ROMs is included in the subfolder FileSplitter.
It took five days to write the code of AstroFloppyImage. There is a version
for JAVA 1.1.8 and JView, which uses a deprecated JAVA API and a Swing
version for JAVA 1.8, which doesn't use a deprecated JAVA API. The Swing
version can be found in the subfolder AstroFloppyImageSwing.